Event Badge Printing: What to Use and How to Set It Up
Steps at a glance
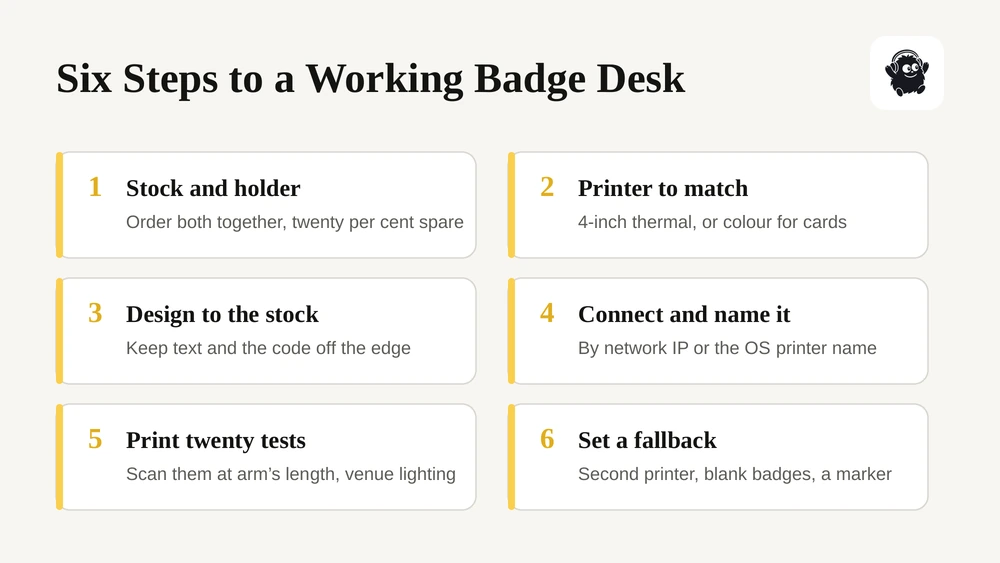
- Pick the stock and the holder together. Order badge stock and holders as one decision, and order at least twenty per cent more stock than you have attendees.
- Choose the printer to match the stock. A 4-inch thermal badge printer for 4-inch stock, or an office or card printer if you are printing in colour.
- Design to the printable area. Thermal printers cannot print to the edge, so keep text and the QR code inside a safe margin on the real stock size.
- Connect the printer and name it. Over the network by IP address, or by the operating system printer name on the check-in machine.
- Print twenty test badges. Use the real stock and check the QR code scans with your own app, at arm's length, under the venue lighting.
- Set a fallback. A second printer, a box of blank badges and a marker, because every experienced organizer has used the marker.
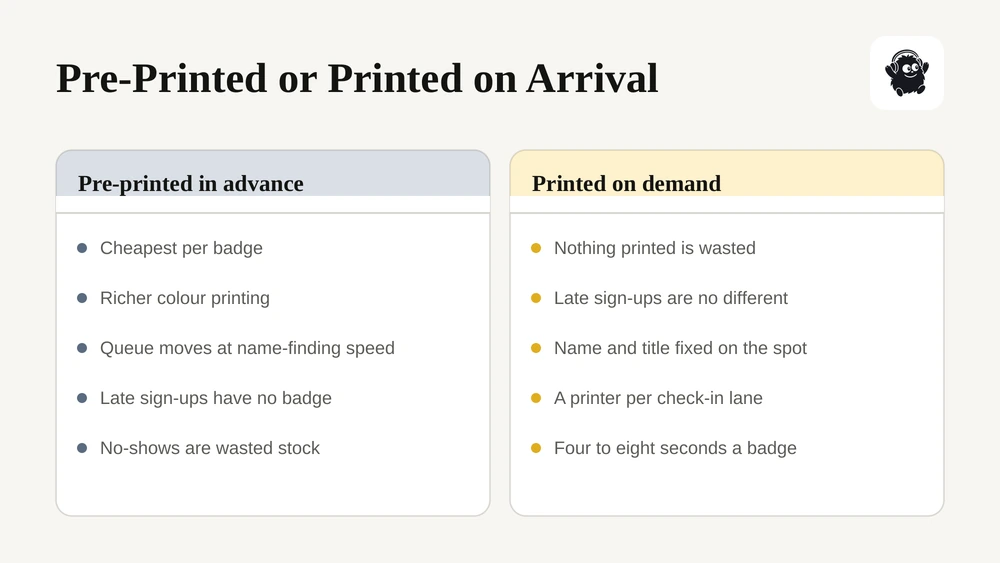
Event badge printing comes down to one decision: print every badge before the doors open, or print each one as the attendee arrives. Pre-printing is cheaper and faster per badge but wrong for anyone who registers late, changes their name or never shows. On-demand printing handles all three, costs more in hardware, and lives or dies on how fast the badge comes out of the printer.
This guide covers both approaches, the badge stock and printer types you will actually encounter, how the data gets onto the badge, a setup sequence for on-site printing, and what goes wrong on day one. It is written for conference, trade show and expo organizers deciding how to badge a few hundred to a few thousand people.
Key takeaways
- Pre-print only if your list is stable. Any event with walk-ups, late registrations or title changes needs on-demand printing for at least part of the room.
- Badge size is set by your stock, not your design. Pick the stock and the holder first, then design to it.
- Thermal printers are fast and monochrome; office and card printers are slower and full colour. Most conferences want the first for volume and the second for VIPs.
- The scan matters more than the print. A badge with a QR code that your own check-in app reads is worth more than a beautiful badge nobody can scan.
- Test the whole chain on the real printer, with the real stock, a week before the event. Not the day before.
The two ways to print a badge
Pre-printed badges are produced in a batch from the registration list, usually alphabetised into boxes or on tables for self-collection. The cost per badge is low, you can use richer printing, and the queue moves at the speed of someone finding a name.
The catch is change. Every late registration, name correction, title change and no-show is a manual exception, and the no-shows are the expensive part: a third of the badges you print for a free conference may never be collected.
On-demand badges are printed at the desk as each person checks in, triggered by a scan of their registration QR code or a search for their name. Nothing is wasted, late registrations are no different from early ones, and corrections happen on the spot.
The cost is hardware and speed. You need a printer per check-in lane, and every second the printer takes is a second someone stands there. A thermal badge printer takes roughly four to eight seconds; a colour card printer can take thirty or more.
Most events end up hybrid: pre-print the speakers, sponsors and VIPs in colour, print everyone else on demand. Our guide to event check-in apps covers the scanning side of the same desk.
Badge stock and sizes
Badge size is a hardware decision. The stock has to fit the printer, and the holder has to fit the stock, so choose those two first and design into whatever is left.
| Stock | Size | Typical use |
|---|---|---|
| Name badge | 4 × 3 in | The default conference badge, landscape, in a clip or lanyard holder |
| Name badge, portrait | 3 × 4 in | Same stock printed the other way, common with lanyards |
| Conference badge | 4 × 6 in | Large badge with room for a programme, track or meal icons on the back |
| Fold-over badge | 4 × 12 in | Prints both sides in one pass, folds over the lanyard, no holder needed |
| Small name badge | 3.5 × 2.25 in | Tight stock for short events and tabletop shows |
| CR80 card | 3.38 × 2.13 in | Plastic card, for multi-day and re-usable credentials |
| Brother DK or DYMO rolls | 100 × 62 mm, 4 × 2.25 in | Label-roll badges for small events and office printers |
| Avery 5395 sheet | 3.375 × 2.33 in | Sheet labels for an ordinary office printer, no special hardware |
Two practical notes. Fold-over stock is the quiet favourite for large conferences because it prints both sides at once and removes the plastic holder from your budget and your bin. And if you are printing on sheet labels from an office printer, you are effectively pre-printing, because feeding a sheet per person at a check-in desk is not viable.
Printer types
| Type | Speaks | Speed | Colour | Suits |
|---|---|---|---|---|
| Thermal badge or label printer | ZPL (Zebra ZD421, ZD621) | Fast, a few seconds | Monochrome | The main on-demand badge lane |
| Ticket printer | FGL (Boca Lemur, Mini) | Very fast | Monochrome | Venues already running Boca stock for tickets |
| Receipt printer | ESC/POS (Epson, Star) | Fast | Monochrome | Door lists and receipts, not really badges |
| Office, badge or card printer | PDF through the printer's own driver | Slower | Full colour | VIP and sponsor badges, plastic cards, small events |
The distinction that matters is how the badge reaches the printer. Thermal printers are sent instructions straight to the print head, which is why they are fast and why their output is monochrome and fixed to the stock width. Office, card and colour label printers take a page through the operating system's own driver, which is why they print anything the driver can but take longer.
If you already own a printer, start there. A Brother QL or a DYMO sitting in the office will badge a 150-person event perfectly well.
Getting the data onto the badge
A badge usually carries the attendee's name, their organisation, their ticket type or track, and a scannable code. The last one does the work.
The code should be the same identifier your check-in app already reads, so a badge can be scanned at a session door, a workshop or an exhibitor's booth without a second system. Our explainer on how QR code check-in works covers the mechanics, and tracking event attendance covers what you do with the scans afterwards.
Decide early what is printed and what is not. Job titles change between registration and the event and are the most common reprint. Dietary requirements and accessibility needs should never be printed on a badge; they belong in your attendee list, not on someone's chest. Pronouns should be opt-in at registration rather than assumed, which is a question your registration form has to ask properly.
Colour-coding by ticket type is worth doing even on a monochrome printer: a thick black band, a printed word, or a different lanyard colour all work, and they let staff see at a glance who belongs in a room.
Setting up on-site badge printing
1. Pick the stock and the holder together. Order both, and order at least twenty per cent more stock than you have attendees.
2. Choose the printer to match the stock. A 4-inch thermal printer for 4-inch stock, or an office printer if you are printing in colour on sheets or rolls.
3. Design the badge to the stock's real printable area. Thermal printers cannot print to the edge, so keep text and the QR code inside a safe margin.
4. Connect the printer and name it. Over the network by IP, or by the operating system's printer name on the check-in machine.
5. Print twenty test badges on the real stock. Check the QR code scans with your own app, from the distance a person will hold it, under the venue's lighting.
6. Set a fallback. A second printer, a box of blank badges and a marker. Every experienced organizer has used the marker.
What goes wrong on day one
The printer is not connected. The most common failure, and almost always a network or driver problem rather than a printer problem. This is why step four happens a week early, not at 7am.
The QR code will not scan. Usually because it was printed too small, too close to the edge, or on stock with a glossy finish. Twenty test badges would have caught it.
The queue is one lane. A single printer is a single point of failure and a single queue. Two lanes with two printers is more than twice as fast, because one jam does not stop everything.
The badge is right but the data is stale. If badges print from an export rather than live registration data, anyone who registered after the export has no badge. Print from the live list.
Nobody pre-printed the speakers. Speakers arrive early, in a hurry, often through a different door. Print them in advance and have them in a named envelope.
What badge printing costs
Three separate budgets, and organizers usually forget the third.
Hardware. A thermal badge printer is typically in the hundreds of dollars; a colour card printer runs into the thousands. Many organizers rent for a single event rather than buy.
Consumables. Badge stock, ribbons for thermal transfer printers, lanyards and holders. Per badge this is usually cents for paper stock and more for plastic cards.
Software. Some platforms include badge design and printing; some sell it as a module, often priced per registrant or per event. Ask whether badge printing is included before you compare platform fees, because a per-registrant badge charge can exceed the ticketing fee. Our breakdown of event management software costs sets the published rates side by side, and Cvent alternatives covers the enterprise tier where badging is usually a module.
Where Eventist fits
Eventist includes a badge designer and printing rather than selling them as a module. You lay a badge out on the stock you actually bought, from presets covering the 4 × 3 inch name badge, the 4 × 6 inch conference badge, portrait and fold-over stock, CR80 cards, Brother DK and DYMO rolls and Avery 5395 sheets, or you enter a custom size from half an inch to twenty-four.
It prints to the printers events already own. Zebra badge and label printers over ZPL, Boca ticket printers over FGL, Epson and Star receipt printers over ESC/POS, and anything else through the printer's own driver in full colour, including Brother QL, DYMO, Epson ColorWorks and card printers. A printer can sit on the network by IP or be the machine's own named printer, and a badge can print automatically as a ticket is sold at the door.
Badges carry the same QR code as the ticket, so the badge your attendee wears is the credential your staff scan at a session door, with any phone, without a second system.

You can see how it fits a conference on our conferences page, or compare the numbers on pricing.
Frequently Asked Questions
What is the best way to print event badges?
For an event with a stable guest list, pre-printing in advance is cheaper and the queue moves quickly. For anything with walk-ups, late registrations or title changes, print on demand at the desk from a thermal badge printer, which takes a few seconds per badge and wastes nothing. Most conferences do both: colour badges prepared in advance for speakers, sponsors and VIPs, everyone else printed on arrival.
What size is a conference badge?
The common sizes are 4 × 3 inches landscape, 3 × 4 inches portrait, and 4 × 6 inches where the badge needs room for a programme or track icons on the back. Fold-over stock at 4 × 12 inches prints both sides in one pass and needs no plastic holder. Pick the stock and the holder together before designing, because the stock sets the size and the printable area, not the other way round.
What printer do I need for on-site badge printing?
A 4-inch thermal badge or label printer, such as a Zebra ZD421 or ZD621, is the usual choice for a check-in desk: it prints in a few seconds, in monochrome, straight onto badge stock. For colour badges or plastic cards you need a card printer or a colour label printer, which is slower and more expensive. For a small event, a Brother QL or DYMO label printer you already own will do the job.
How long does it take to print a badge on site?
A thermal badge printer takes roughly four to eight seconds per badge, which is fast enough that the scan and the greeting take longer than the print. A colour card printer can take thirty seconds or more, which is why cards are usually reserved for VIPs or printed in advance. Plan one printer per check-in lane and test the real speed with your real stock before the event.
Should badges include a QR code?
Yes, and it should be the same code your check-in app already reads. That way the badge works as the credential for session doors, workshops and exhibitor lead capture without a second system. Print it large enough to scan at arm's length, keep it away from the edge of the stock, and test the scan on a real printed badge under venue lighting rather than on screen.
Sources
- Event structured data, Google Search Central
- Guidelines for obtaining meaningful consent, Office of the Privacy Commissioner of Canada
- Accessibility requirements, Government of Ontario
Recommended
Tags
Ready to simplify your events?
Join hundreds of organizers, studios, and festival directors who trust Eventist to run their events.